When the SD card is formatted, it erases all existing data as well as changes the file system of the SD card from FAT32 (for cameras) to exFAT (for computers). All data that was stored on the card before formatting is still intact but inaccessible since the new file system does not recognize it. Hence, in order to retrieve photos from formatted SD cards, we must first convert them back to FAT32 and then re-access all its data.
Preparing the SD Card
Before attempting to recover photos, you should take some steps to ensure that the recovery process will be successful. It is important to stop taking any new photos on the card, as this can overwrite your existing data and make it impossible to recover. If you are able to, back up any important data on a different device before beginning the recovery process.
1. Using Photo Recovery Software

Decide on what type of photo recovery software you would like to use. There are several photo recovery programs available like “Stellar Photo Recovery” that can allow you to recover photos from digital cameras and cell phones, but they vary in cost and compatibility with different devices. Choose one that is designed specifically for recovering photos from SD cards and make sure it’s compatible with your device before downloading.
To use the software, you will need to download and install it on your computer. The photo recovery software program should have an easy-to-follow user interface that allows you to walk through the steps of recovering your photos with minimal effort. The program will scan the SD card for deleted or lost files, and may be able to detect hidden files or thumbnails which could indicate there is a better chance of finding and restoring data.
When running a scan on the SD card, be sure that all relevant image packers are selected in order for the program to find all possible images. Once it has finished scanning, a preview window of recovered images should open so that you can select which ones you wish to save. After selecting desired images, make sure to choose a target location on your computer where the files can be saved in their original format before they are permanently lost.
Once this process is completed, the restored pictures will be available so they can be viewed on a computer or printed out as needed.
2. Recovering Photos Using CMD

The Command Prompt (CMD) is a powerful tool to perform various tasks. One of these tasks can be to recover photos from a formatted SD card. It will help you scan and detect the deleted/lost photos in an SD card, as well as allow you to preview and get back the desired images with ease.
Here are the simple steps you should take:
- Plug the SD Card into your computer to make it active.
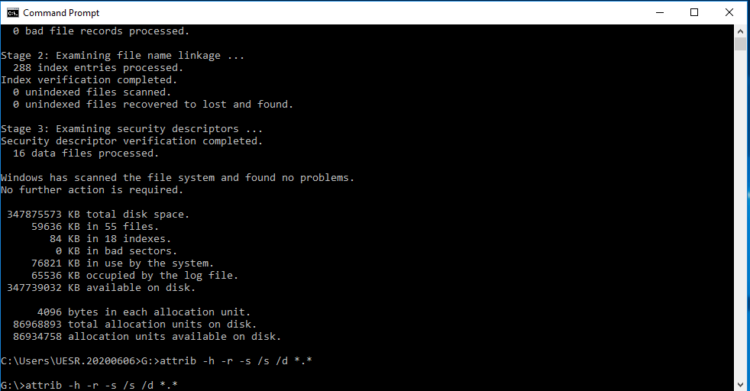
- Open the Command Prompt window, type ‘chkdsk E: /f’ and hit Enter button twice, where E stands for your external drive letter representing the formatted SD card drive on your computer.
- Type ‘y’ and press Enter button; this will allow CMD to start scanning lost files in the formatted SD card for the recovery process.
- After completion of the volume analysis process, execute the command “attrib -h -r -s /s /d E:\*.*” to uncover all hidden files on the described storage device and then initiate the recovery process by entering “E:\>undelete *.*” command followed by clicking enter again on the last prompt command line on the recovery engine window.
3. Recovery via Recycle Bin

Recovery via Recycle Bin follows the “First In, Last Out” rule for recovering deleted photos: If your file was stored in your SD card long before it was accidentally erased, it can be recovered quickly within the same session by opening up the Windows Recycle Bin after being formatted and deleting unnecessary files.
Photos are then presented in list view with their date created/modified display information along with name/type size in the order of most recent. Once you select individual files or all of them at once, you can use the Recover button provided at the bottom panel to save them on the system’s storage drive or external drives connected to the same PC without affecting the original format & quality of the image.
Conclusion
Now that you have successfully recovered the data stored on your SD card, it is important to create backups of any data that is important to you. To avoid losing photos and other important files in the future, it may be a good idea to start backing up your files regularly.
If you have an Android device, make sure to enable the automatic backup option in your settings menu. Additionally, you can use third-party cloud storage solutions such as Dropbox or Google Drive to store the backup securely online and view it from anywhere.
It’s also recommended that you perform regular maintenance tasks on your storage devices, like scanning for viruses and checking for disk errors with a disk utility program. This will help keep your storage devices healthy and protect them from becoming corrupted or damaged.
Finally, if you plan to store sensitive personal or financial information on removable media such as SD cards, always make sure to encrypt the drive with a strong password. With these tips in mind, you should be able to keep your SD card healthy so that it will continue to serve its purpose of protecting your valuable data over time.


